We are required to connect the Proxmox Server with a trunk port or a network connection with tagged VLANs. If the trunk port is configured properly, then there should not be any issues configuring the Proxmox server side. Please have a read on this page from Proxmox themselves.
In summary, it is best to configure this via the Proxmox shell interface. In this setup, I choose to use a VLAN-aware Linux bridge. First, identify the network interface connected to the trunk port. In my case, I have the eth0 interface connected to the trunk interface and vmbr0 as the bridge. We have 2 VLANs, VLAN 100 with subnet 192.168.100.0/24 and VLAN 200 with subnet 192.168.200.0/24.
In summary, it is best to configure this via the Proxmox shell interface. In this setup, I choose to use a VLAN-aware Linux bridge. First, identify the network interface connected to the trunk port. In my case, I have the eth0 interface connected to the trunk interface and vmbr0 as the bridge. We have 2 VLANs, VLAN 100 with subnet 192.168.100.0/24 and VLAN 200 with subnet 192.168.200.0/24.
Below is the sample configuration of the /etc/network/interfaces
root@proxmox:~# vi /etc/network/interfaces
auto eth0
iface eth0 inet manual
#Trunk Port
auto vmbr0
iface vmbr0 inet manual
bridge-ports eth0
bridge-stp off
bridge-fd 0
bridge-vlan-aware yes
bridge-vids 100,200
# Main bridge interface
auto vmbr0.100
iface vmbr0.100 inet static
address 192.168.100.201/24
gateway 192.168.100.1
# VLAN 100 interface
auto vmbr0.200
iface vmbr0.200 inet static
address 192.168.200.201/24
gateway 192.168.200.1
# VLAN 200 interface
Once the configuration is saved, you can activate these new bridge interface WITHOUT restarting the Proxmox server provided there are no virtual machines connected to these interfaces initially especially the main bridge interface. Use the ifup command which is preinstalled with Proxmox.
root@proxmox:~# ifup -a
Once the command executes without any errors, verify the VLANs interface with listing them.
root@proxmox:~# ip a show
2: eth0: <BROADCAST,MULTICAST,UP,LOWER_UP> mtu 1500 qdisc mq master vmbr0 state UP group default qlen 1000
link/ether e4:3d:1a:fe:d6:c3 brd ff:ff:ff:ff:ff:ff
3: vmbr0: <BROADCAST,MULTICAST,UP,LOWER_UP> mtu 1500 qdisc noqueue state UP group default qlen 1000
link/ether e4:3d:1a:fe:d6:c3 brd ff:ff:ff:ff:ff:ff
inet6 fe80::e63d:1aff:fefe:d6c3/64 scope link
valid_lft forever preferred_lft forever
[...]
21: vmbr0.100@vmbr0: <BROADCAST,MULTICAST,UP,LOWER_UP> mtu 1500 qdisc noqueue state UP group default qlen 1000
link/ether e4:3d:1a:fe:d6:c3 brd ff:ff:ff:ff:ff:ff
inet 192.168.100.201/24 scope global vmbr2.10
valid_lft forever preferred_lft forever
inet6 fe80::e63d:1aff:fefe:d6c3/64 scope link
valid_lft forever preferred_lft forever
22: vmbr0.200@vmbr0: <BROADCAST,MULTICAST,UP,LOWER_UP> mtu 1500 qdisc noqueue state UP group default qlen 1000
link/ether e4:3d:1a:fe:d6:c3 brd ff:ff:ff:ff:ff:ff
inet 192.168.200.201/24 scope global vmbr2.10
valid_lft forever preferred_lft forever
inet6 fe80::e63d:1aff:fefe:d6c3/64 scope link
valid_lft forever preferred_lft forever
That should be it and then you can add VMs to specific VLANs by tagging their interfaces such as the sample below using VLAN 100
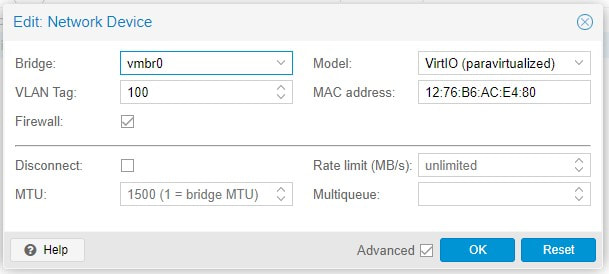
Once the VM starts, verify the IP address is working either manually or dynamically if the VLAN is configured with DHCP service. All the best.
 RSS Feed
